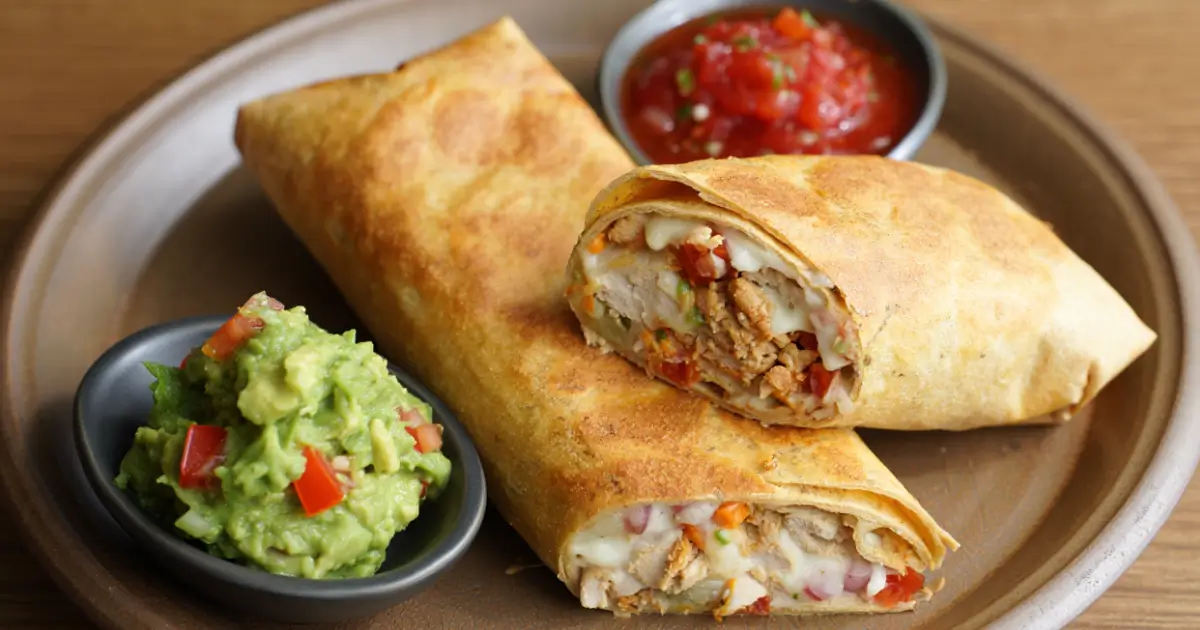
The Best Baked Chicken Chimichangas
If you’re craving something hearty, flavorful, and satisfyingly crunchy—but without all the oil from deep frying—then Baked Chicken Chimichangas are about to become your new favorite dinner. Imagine a golden, crispy tortilla filled with juicy, seasoned shredded chicken, creamy cheese, and zesty spices, baked to perfection in the oven. This recipe keeps all the Tex-Mex goodness of traditional chimichangas while being lighter and easier to make at home.
Whether you’re cooking for family dinner, meal prepping for the week, or impressing friends at a casual get-together, these baked beauties deliver every time. Let’s dive in and make the best Baked Chicken Chimichangas from scratch.
Table of Contents
Why You’ll Love This Recipe
Baked Chicken Chimichangas are the ultimate comfort food—crispy on the outside, cheesy and flavorful inside, and much healthier than fried versions. Here’s why they’re a winner:
- Healthier than fried: You get the same crunch and texture without submerging anything in oil.
- Easy to make ahead: Prepare the filling and even assemble them early, then just bake when ready to eat.
- Family-friendly: Kids and adults alike love the mild, cheesy Tex-Mex flavors.
- Customizable: You can tweak the filling to suit your taste—spice it up, make it creamy, or swap the protein.
These baked chimichangas are proof that you can enjoy a restaurant-quality meal right from your own kitchen—with minimal effort and no greasy mess.
Ingredients for Baked Chicken Chimichangas
Here’s everything you’ll need to make about 6 to 8 large chimichangas.
For the Chicken Filling:
- 2 cups shredded cooked chicken (rotisserie or leftover chicken works great)
- 1 tablespoon olive oil
- 1 small onion, finely chopped
- 2 cloves garlic, minced
- 1 cup salsa (mild or spicy, your choice)
- ½ cup sour cream
- 1 teaspoon ground cumin
- 1 teaspoon chili powder
- ½ teaspoon paprika
- Salt and pepper to taste
- 1 ½ cups shredded cheddar cheese (or a Mexican blend)
For Assembling and Baking:
- 6–8 large flour tortillas (8–10 inch size)
- 2 tablespoons melted butter or olive oil spray for brushing
- Extra shredded cheese for topping (optional)
For Serving (Optional):
- Guacamole or sliced avocados
- Sour cream
- Pico de gallo or salsa
- Shredded lettuce and diced tomatoes
Step-by-Step Instructions
Follow these easy steps to make your Baked Chicken Chimichangas perfectly crispy and flavorful every time.
Step 1: Prepare the Chicken Filling
- Cook the aromatics
Heat olive oil in a large skillet over medium heat. Add the chopped onion and sauté for 2–3 minutes until softened. Then stir in the minced garlic and cook for another 30 seconds until fragrant. - Add flavor and moisture
Mix in the shredded chicken, salsa, sour cream, cumin, chili powder, paprika, salt, and pepper. Stir well to coat everything evenly. - Simmer briefly
Let the mixture cook for about 5 minutes on low heat so the flavors blend together. The mixture should be thick and creamy—not watery. If it seems too runny, let it simmer a few extra minutes to reduce. - Add cheese
Remove from heat and stir in 1 ½ cups of shredded cheese. The cheese will melt slightly and bind everything together.
Set the filling aside to cool slightly while you prep your tortillas.
Step 2: Warm the Tortillas
To make rolling easier and prevent tearing, warm the tortillas slightly.
- Wrap them in a damp paper towel and microwave for about 30 seconds, or
- Heat them briefly on a dry skillet for 10–15 seconds per side.
Warm tortillas are more pliable, making it easier to roll your chimichangas tightly.
Step 3: Assemble the Chimichangas
Now for the fun part—rolling them up!
- Lay one tortilla flat on your work surface.
- Spoon about ½ cup of the chicken mixture into the center.
- Fold in the sides of the tortilla, then roll it up tightly like a burrito, ensuring the filling stays enclosed.
- Place seam-side down on a baking sheet lined with parchment paper.
Repeat with the remaining tortillas and filling.
Step 4: Brush and Bake
- Preheat your oven to 400°F (200°C).
- Lightly brush each rolled chimichanga with melted butter or spray them with olive oil spray. This helps them turn golden and crisp.
- Bake for 20–25 minutes, flipping once halfway through for even browning.
When done, the tortillas should be golden, slightly puffed, and crisp on the outside.
Step 5: Add Optional Toppings
If you want an extra cheesy topping, sprinkle a bit of shredded cheese over the chimichangas in the last 5 minutes of baking and let it melt.
Serve hot, garnished with guacamole, sour cream, or fresh pico de gallo.

Tips and Tricks for Perfect Baked Chicken Chimichangas
Even though this recipe is easy, a few small details can take your chimichangas from good to unbelievably delicious.
1. Use Rotisserie Chicken for Ease
If you’re short on time, grab a store-bought rotisserie chicken. It’s already cooked and seasoned, so you can shred it and mix it right into your filling.
2. Don’t Overfill
It’s tempting to pack in as much filling as possible, but overstuffed chimichangas can burst open in the oven. Stick to about ½ cup of filling per tortilla.
3. Seal the Edges Tightly
Make sure to fold in the sides first and roll tightly to keep the filling from spilling out. You can even secure the seam with a toothpick while baking (just remember to remove it before serving).
4. Crispier Finish
For an even crunchier texture, you can air fry them for the last 5 minutes or broil them for 2–3 minutes at the end. Keep a close eye to avoid burning.
5. Use the Right Tortillas
Flour tortillas are essential here. Corn tortillas will crack and won’t hold the filling well. Choose burrito-sized tortillas for generous portions.
Ingredient Substitutions
Not all ingredients are always on hand—here are some smart swaps:
- Chicken → Use shredded beef, or cooked ground turkey.
- Cheese → Try Monterey Jack, Pepper Jack, or mozzarella.
- Sour Cream → Swap for Greek yogurt for a tangy, lighter option.
- Salsa → Use enchilada sauce or diced tomatoes with green chilies.
- Tortillas → Whole wheat tortillas work great if you want extra fiber.
This recipe is flexible—feel free to get creative based on what’s in your fridge.
Serving Suggestions
Baked Chicken Chimichangas are versatile and pair beautifully with other sides and toppings. Try these serving ideas:
- Classic Mexican rice or cilantro lime rice for a filling meal.
- Refried beans or black beans for added protein.
- Corn salad or grilled vegetables for a fresh side.
- A drizzle of chipotle sauce or queso dip for creamy heat.
They’re great on their own, too—just slice in half and serve with a dollop of sour cream and guacamole for dipping.
How to Store and Reheat Baked Chicken Chimichangas
If you’ve got leftovers (lucky you!), here’s how to store and reheat them so they stay delicious.
Refrigerating
- Store in an airtight container for up to 3 days.
- Reheat in the oven at 350°F (175°C) for 10–12 minutes until warm and crispy again.
Freezing
- Let the chimichangas cool completely.
- Wrap each one tightly in foil, then place in a freezer-safe bag.
- Freeze for up to 3 months.
To reheat from frozen, bake directly at 375°F (190°C) for about 25–30 minutes.
Avoid microwaving if you want to keep the crisp texture—an oven or air fryer works best.
Variations to Try
Once you’ve mastered the classic Baked Chicken Chimichangas, experiment with these flavor variations:
1. Spicy Chicken Chimichangas
Add diced jalapeños or a dash of hot sauce to the filling for extra kick.
2. Creamy Chicken and Spinach Chimichangas
Stir in a handful of chopped spinach and a spoonful of cream cheese into the filling for a creamy, rich twist.
3. BBQ Chicken Chimichangas
Replace the salsa with barbecue sauce and add a bit of mozzarella. The smoky sweetness pairs beautifully with chicken.
4. Vegetarian Chimichangas
Swap the chicken for black beans, corn, and sautéed bell peppers. Add a bit of cumin and lime juice for brightness.
5. Breakfast Chimichangas
Use scrambled eggs, diced , and cheese for a breakfast-friendly version. Perfect for mornings on the go.
Each variation bakes up just as crispy and satisfying as the original.
Common Mistakes to Avoid
Even simple recipes have their pitfalls. Here’s what to watch for when making Baked Chicken Chimichangas:
- Watery filling: If your salsa is too thin, the tortillas can get soggy. Let the filling reduce until thick.
- Under-seasoning: Chicken needs a good dose of spices to stand out—don’t be shy with cumin and chili powder.
- Skipping the butter or oil: The brush of fat on top is key to achieving that golden, crispy crust.
Make-Ahead Tips
If you want to prep ahead, this recipe is perfect:
- Make the filling up to 2 days in advance and store it in the fridge.
- You can even roll the chimichangas a few hours ahead and refrigerate until ready to bake.
- Brush with butter right before baking to keep the tortillas from drying out.
This makes it a great choice for weeknight dinners or casual gatherings.
Nutrition Information (Approximate per Serving)
- Calories: 420
- Protein: 28g
- Carbohydrates: 35g
- Fat: 18g
- Fiber: 3g
- Sodium: 680mg
Note: These values may vary depending on the ingredients and brands you use.
Prep and Cook Time
- Prep Time: 20 minutes
- Cook Time: 25 minutes
- Total Time: 45 minutes
- Servings: 6–8 chimichangas
Conclusion (Baked Chicken Chimichangas)
Baked Chicken Chimichangas are the best of both worlds—crispy, cheesy, and flavorful like your favorite restaurant version, but baked instead of fried for a lighter twist. They’re easy to make, endlessly customizable, and perfect for weeknight dinners or meal prep.
Once you try these oven-baked chimichangas, you’ll wonder why you ever fried them in the first place. Serve them fresh from the oven with a side of rice, salsa, and a big scoop of guacamole—and get ready for an explosion of Tex-Mex flavor in every bite.